
This tutorial guides you in using the basics of the 3d api LibGDX offers.
The full source and a runnable tests of this tutorial can be found on this github repository.
I assume you are already familiar with LibGDX, so let’s setup a new project and call it Basic3DTest. We will have to implement ApplicationListener, so let’s start that from scratch:
public class Basic3DTest implements ApplicationListener {
	@Override
	public void create () {
	}

	@Override
	public void render () {
	}

	@Override
	public void dispose () {
	}

	@Override
	public void resume () {
	}

	@Override
	public void resize (int width, int height) {
	}

	@Override
	public void pause () {
	}
}
Now let’s give that some body. First we’ll need to add a camera, which allows us to view the 3D scene we’re creating from a certain perspective.
public class Basic3DTest implements ApplicationListener {
	public PerspectiveCamera cam;

	@Override
	public void create () {
		cam = new PerspectiveCamera(67, Gdx.graphics.getWidth(), Gdx.graphics.getHeight());
		cam.position.set(10f, 10f, 10f);
		cam.lookAt(0,0,0);
		cam.near = 1f;
		cam.far = 300f;
		cam.update();
	}
...
}
Here we create a new PerectiveCamera with a field of view of 67 degrees (which is common to use) and we set the aspect ratio to the current width and height. Then we set the camera 10 units to the right, 10 units up and 10 units back. The Z axis is pointing towards the viewer, so for the viewer a positive Z value of the camera is moving the viewer back. We set the camera to look at (0,0,0) because that is where we are placing our 3D object to view. We set the near and far values to make sure we would always see our object. And finally we update the camera so all changes we made are reflected by the camera.
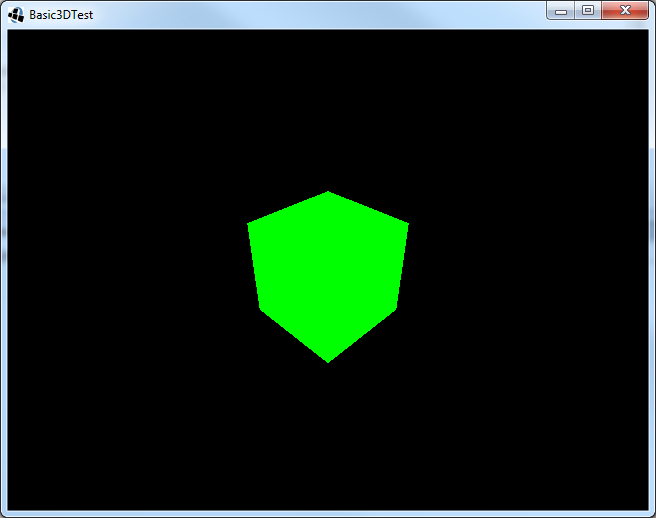
Now let’s add something we can actually render. We could ofcourse launch some modeling application and create something to render (we will get to that soon), but for now we’ll just create a simple box by code.
public class Basic3DTest implements ApplicationListener {
	public PerspectiveCamera cam;
	public Model model;
	public ModelInstance instance;

	@Override
	public void create () {
		cam = new PerspectiveCamera(67, Gdx.graphics.getWidth(), Gdx.graphics.getHeight());
		...
		cam.update();

		ModelBuilder modelBuilder = new ModelBuilder();
		model = modelBuilder.createBox(5f, 5f, 5f,
			new Material(ColorAttribute.createDiffuse(Color.GREEN)),
			Usage.Position | Usage.Normal);
		instance = new ModelInstance(model);
	}

	@Override
	public void dispose () {
		model.dispose();
	}
...
}
Here we instantiate a ModelBuilder, which can be used to create models on code. Then we create a simple model box with a size of 5x5x5. We also add a material with a green diffuse color to it and add position and normal components to the model. When creating a model at least Usage.Position is required. Usage.Normal adds normals to the box, so e.g. lighting works correctly. Usage is a subclass of VertexAttributes.
A model contains everything on what to render and it keeps track of the resources. It doesn’t contain information like where to render the model. Therefor we need to create a ModelInstance. A ModelInstance contains the location, rotation and scale the model should be rendered at. By default this is at (0,0,0), so we just create a ModelInstance which should be rendered at (0,0,0).
The model needs to be disposed, so we added a line to our Dispose() method.
Now let’s render the model instance.
public class Basic3DTest implements ApplicationListener {
	public PerspectiveCamera cam;
	public ModelBatch modelBatch;
	public Model model;
	public ModelInstance instance;

	@Override
	public void create () {
		modelBatch = new ModelBatch();

		cam = new PerspectiveCamera(67, Gdx.graphics.getWidth(), Gdx.graphics.getHeight());
		...
		cam.update();

		ModelBuilder modelBuilder = new ModelBuilder();
		model = modelBuilder.createBox(5f, 5f, 5f,
				new Material(ColorAttribute.createDiffuse(Color.GREEN)),
				Usage.Position | Usage.Normal);
		instance = new ModelInstance(model);
	}

	@Override
	public void render () {
		Gdx.gl.glViewport(0, 0, Gdx.graphics.getWidth(), Gdx.graphics.getHeight());
		Gdx.gl.glClear(GL20.GL_COLOR_BUFFER_BIT | GL20.GL_DEPTH_BUFFER_BIT);

		modelBatch.begin(cam);
		modelBatch.render(instance);
		modelBatch.end();
	}

	@Override
	public void dispose () {
		modelBatch.dispose();
		model.dispose();
	}
...
}
View full source code on github
Here we add the ModelBatch, which is responsable for rendering and we initialize it in the create method. In the render method we clear the screen, call modelBatch.begin(cam), render our ModelInstance and then call modelBatch.end() to finish rendering. Finally we need to dispose the modelBatch to make sure all resources (like the shaders it uses) are properly disposed.
That looks OK, but some lighting might help a bit, so let’s add lighting:
public class Basic3DTest implements ApplicationListener {
	public Environment environment;
	...

	@Override
	public void create () {
		environment = new Environment();
		environment.set(new ColorAttribute(ColorAttribute.AmbientLight, 0.4f, 0.4f, 0.4f, 1f));
		environment.add(new DirectionalLight().set(0.8f, 0.8f, 0.8f, -1f, -0.8f, -0.2f));
		...
	}

	@Override
	public void render () {
		Gdx.gl.glViewport(0, 0, Gdx.graphics.getWidth(), Gdx.graphics.getHeight());
		Gdx.gl.glClear(GL20.GL_COLOR_BUFFER_BIT | GL20.GL_DEPTH_BUFFER_BIT);

		modelBatch.begin(cam);
		modelBatch.render(instance, environment);
		modelBatch.end();
	}
	...
}
View full source code on github
Here we add an Environment instance. We construct it and set the ambient light (0.4, 0.4, 0.4), note that the alpha value is ignored. Then we add a DirectionalLight with the color of (0.8, 0.8, 0.8) and the direction of (-1.0, -0.8f, 0.2). I assume that you’re familiar with lights in general. Finally we pass the environment to the modelbatch when rendering the instance.

That looks alot better. Now let’s control the camera so we can look at the model from other perspectives.
public class Basic3DTest implements ApplicationListener {
	...
	public CameraInputController camController;
	...

	@Override
	public void create () {
		...
		camController = new CameraInputController(cam);
		Gdx.input.setInputProcessor(camController);
	}

	@Override
	public void render () {
		camController.update();
		...
	}
...
}
View full source code on github
Here we add a CameraInputController which we create with our cam as argument. We also set Gdx.input.setInputProcessor to this camController and make sure to update it in the render call. That’s all there is to add the basic camera controller. You can now drag to make the camera rotate.
The complete Basic3DTest code is also included with the LibGDX tests.
This webpage is open source and can be found at: https://github.com/xoppa/xoppa.github.io.
The accompanying sources can be found at: https://github.com/xoppa/blog.
Let me know what you think about this post in the comments below. If you need help then please use the forum instead. If you found an issue with this post then please report an issue or send a pull request.