
In the previous tutorial we’ve seen how to check whether a 3D object is visible to the camera or not. In this tutorial we will proceed with that by checking which object is touched/clicked and interact with objects by dragging them around within the 3D world.
If you haven’t done so, I suggest to follow the previous tutorial prior to reading this tutorial, since we will take it’s code as base for this tutorial. As usual, the sources, assets and a runnable test of this tutorial can be found on github.
Before we can actually start interacting with objects, we’ll have to receive events when the user touches and drags on the screen. This can be done by implementing the InputListener interface or by extending the InputAdapater class. We’ll do the latter, so we only have to implement the methods we actually need, the InputAdapter will simply return false for the methods (input events) that we don’t override. If you’re new to handling input or want to read more about it, you might want check out this wiki page.
For reference, here’s the full listing of the modified code. We’ll look at the changes below:
public class RayPickingTest extends InputAdapter implements ApplicationListener {
	public static class GameObject extends ModelInstance {
		public final Vector3 center = new Vector3();
		public final Vector3 dimensions = new Vector3();
		public final float radius;

		private final static BoundingBox bounds = new BoundingBox();

		public GameObject (Model model, String rootNode, boolean mergeTransform) {
			super(model, rootNode, mergeTransform);
			calculateBoundingBox(bounds);
			bounds.getCenter(center);
			bounds.getDimensions(dimensions);
			radius = dimensions.len() / 2f;
		}
	}

	protected PerspectiveCamera cam;
	protected CameraInputController camController;
	protected ModelBatch modelBatch;
	protected AssetManager assets;
	protected Array<GameObject> instances = new Array<GameObject>();
	protected Environment environment;
	protected boolean loading;

	protected Array<GameObject> blocks = new Array<GameObject>();
	protected Array<GameObject> invaders = new Array<GameObject>();
	protected ModelInstance ship;
	protected ModelInstance space;

	protected Stage stage;
	protected Label label;
	protected BitmapFont font;
	protected StringBuilder stringBuilder;

	private int visibleCount;
	private Vector3 position = new Vector3();

	private int selected = -1, selecting = -1;
	private Material selectionMaterial;
	private Material originalMaterial;

	@Override
	public void create () {
		stage = new Stage();
		font = new BitmapFont();
		label = new Label(" ", new Label.LabelStyle(font, Color.WHITE));
		stage.addActor(label);
		stringBuilder = new StringBuilder();

		modelBatch = new ModelBatch();
		environment = new Environment();
		environment.set(new ColorAttribute(ColorAttribute.AmbientLight, 0.4f, 0.4f, 0.4f, 1f));
		environment.add(new DirectionalLight().set(0.8f, 0.8f, 0.8f, -1f, -0.8f, -0.2f));

		cam = new PerspectiveCamera(67, Gdx.graphics.getWidth(), Gdx.graphics.getHeight());
		cam.position.set(0f, 7f, 10f);
		cam.lookAt(0, 0, 0);
		cam.near = 1f;
		cam.far = 300f;
		cam.update();

		camController = new CameraInputController(cam);
		Gdx.input.setInputProcessor(new InputMultiplexer(this, camController));

		assets = new AssetManager();
		assets.load(data + "/invaderscene.g3db", Model.class);
		loading = true;

		selectionMaterial = new Material();
		selectionMaterial.set(ColorAttribute.createDiffuse(Color.ORANGE));
		originalMaterial = new Material();
	}

	private void doneLoading () {
		Model model = assets.get(data + "/invaderscene.g3db", Model.class);
		for (int i = 0; i < model.nodes.size; i++) {
			String id = model.nodes.get(i).id;
			GameObject instance = new GameObject(model, id, true);

			if (id.equals("space")) {
				space = instance;
				continue;
			}

			instances.add(instance);

			if (id.equals("ship"))
				ship = instance;
			else if (id.startsWith("block"))
				blocks.add(instance);
			else if (id.startsWith("invader")) invaders.add(instance);
		}

		loading = false;
	}

	@Override
	public void render () {
		if (loading && assets.update()) doneLoading();
		camController.update();

		Gdx.gl.glViewport(0, 0, Gdx.graphics.getWidth(), Gdx.graphics.getHeight());
		Gdx.gl.glClear(GL20.GL_COLOR_BUFFER_BIT | GL20.GL_DEPTH_BUFFER_BIT);

		modelBatch.begin(cam);
		visibleCount = 0;
		for (final GameObject instance : instances) {
			if (isVisible(cam, instance)) {
				modelBatch.render(instance, environment);
				visibleCount++;
			}
		}
		if (space != null) modelBatch.render(space);
		modelBatch.end();

		stringBuilder.setLength(0);
		stringBuilder.append(" FPS: ").append(Gdx.graphics.getFramesPerSecond());
		stringBuilder.append(" Visible: ").append(visibleCount);
		stringBuilder.append(" Selected: ").append(selected);
		label.setText(stringBuilder);
		stage.draw();
	}

	protected boolean isVisible (final Camera cam, final GameObject instance) {
		instance.transform.getTranslation(position);
		position.add(instance.center);
		return cam.frustum.sphereInFrustum(position, instance.radius);
	}

	@Override
	public boolean touchDown (int screenX, int screenY, int pointer, int button) {
		selecting = getObject(screenX, screenY);
		return selecting >= 0;
	}

	@Override
	public boolean touchDragged (int screenX, int screenY, int pointer) {
		return selecting >= 0;
	}

	@Override
	public boolean touchUp (int screenX, int screenY, int pointer, int button) {
		if (selecting >= 0) {
			if (selecting == getObject(screenX, screenY))
				setSelected(selecting);
			selecting = -1;
			return true;
		}
		return false;
	}

	public void setSelected (int value) {
		if (selected == value) return;
		if (selected >= 0) {
			Material mat = instances.get(selected).materials.get(0);
			mat.clear();
			mat.set(originalMaterial);
		}
		selected = value;
		if (selected >= 0) {
			Material mat = instances.get(selected).materials.get(0);
			originalMaterial.clear();
			originalMaterial.set(mat);
			mat.clear();
			mat.set(selectionMaterial);
		}
	}

	public int getObject (int screenX, int screenY) {
		Ray ray = cam.getPickRay(screenX, screenY);
		int result = -1;
		float distance = -1;
		for (int i = 0; i < instances.size; ++i) {
			final GameObject instance = instances.get(i);
			instance.transform.getTranslation(position);
			position.add(instance.center);
			float dist2 = ray.origin.dst2(position);
			if (distance >= 0f && dist2 > distance) continue;
			if (Intersector.intersectRaySphere(ray, position, instance.radius, null)) {
				result = i;
				distance = dist2;
			}
		}
		return result;
	}

	@Override
	public void dispose () {
		modelBatch.dispose();
		instances.clear();
		assets.dispose();
	}

	@Override
	public void resize (int width, int height) {
		stage.getViewport().update(width, height, true);
	}

	@Override
	public void pause () {
	}

	@Override
	public void resume () {
	}
}
View the full source on github
Quite some changes, let’s discuss them:
public class RayPickingTest extends InputAdapter implements ApplicationListener {
    ...
    private int selected = -1, selecting = -1;
    private Material selectionMaterial;
    private Material originalMaterial;
Like discussed we need to extend InputAdapter to get notified for input events. I’ve also renamed the class, since ray picking is what we’re about to implement. Next, I’ve added two integer variable called ‘selected’ and ‘selecting’. We’ll use these variables to store which ModelInstance within the instances array is selected or currently being selected, -1 means that no instance is selected. I’ve also added two materials, we’ll use this to provide some visual feedback by highlighting the selected object. The ‘selectionMaterial’ will contain the highlight material (a diffuse color) and the ‘originalMaterial’ will contain the original material so we can reset it once the object isn’t selected anymore.
    @Override
    public void create () {
        ...
        Gdx.input.setInputProcessor(new InputMultiplexer(this, camController));
        ...
        selectionMaterial = new Material();
        selectionMaterial.set(ColorAttribute.createDiffuse(Color.ORANGE));
        originalMaterial = new Material();
    }
In the create method we set the input processor to an InputMultiplexer containing both the class we’re creating and the CameraInputController we’ve used previously. Note that the order in which they are supplied in the constructor of InputMultiplexer is important. In this order, each event will first passed to our class and only if that method returns false, it will then be passed to the camController. This allows us to control the camera if e.g. no 3D object is touched.
Also in the create method we construct both the ‘selectionMaterial’ and ‘originalMaterial’. To have some highlight effect we add a diffuse color attribute to the ‘selectionMaterial’ material. We’ll see later on how we use this to highlight the selected object.
    @Override
    public void render () {
        ...
        stringBuilder.setLength(0);
        stringBuilder.append(" FPS: ").append(Gdx.graphics.getFramesPerSecond());
        stringBuilder.append(" Visible: ").append(visibleCount);
        stringBuilder.append(" Selected: ").append(selected);
        label.setText(stringBuilder);
        stage.draw();
    }
Mainly for debugging purposes, we display the value of the selected value using the label, just like we also do with the number of frames per second and the number of visible instances.
    @Override
    public boolean touchDown(int screenX, int screenY, int pointer, int button) {
    	selecting = getObject(screenX, screenY);
    	return selecting >= 0;
    }

    @Override
    public boolean touchDragged(int screenX, int screenY, int pointer) {
    	return selecting >= 0;
    }

    @Override
    public boolean touchUp(int screenX, int screenY, int pointer, int button) {
    	if (selecting >= 0) {
    		if (selecting == getObject(screenX, screenY))
    			setSelected(selecting);
    		selecting = -1;
    		return true;
    	}
    	return false;
    }
Here we override the touchDown, touchDragged and touchup methods of the InputAdapter class. Remember that when we return false in these methods, that the event will be passed to the camera controller.
In the touchDown method we set the ‘selecting’ variable using the method ‘getObject’. This getObject(x, y) method, which we supply with the screen coordinates (x and y) as arguments, will return an index within the instances array to indicate which instance is located at the specified screen coordinate. When no object is located at the specified screen coordinate, we’ll make it return -1. We’ll look at the implementation of this method soon. If no object is being selected, we’ll return false in the touchDown method so we can still control the camController.
In the touchDragged we only simply return whether or not we’re currently selecting an object.
In the touchUp method we also return whether or not we’re currently selecting an object. And if so, we check if the object at the current mouse/touch location is the same as the object when we started selecting. If they are the same (if the user taps on an object for example) then when call the ‘setSelected’ method to update (and highlight) the newly selected object.
Let’s have a look at the ‘setSelected’ method:
	public void setSelected (int value) {
		if (selected == value) return;
		if (selected >= 0) {
			Material mat = instances.get(selected).materials.get(0);
			mat.clear();
			mat.set(originalMaterial);
		}
		selected = value;
		if (selected >= 0) {
			Material mat = instances.get(selected).materials.get(0);
			originalMaterial.clear();
			originalMaterial.set(mat);
			mat.clear();
			mat.set(selectionMaterial);
		}
	}
If the specified value is the same as the currently selected value, there’s no need proceed. Otherwise, if there was an object previously selected, we’ll need to restore it’s material. In this case we assume that the object only has a single material and we access it by index. We remove the highlight color using the clear() method and restore the original material using the set(originalMaterial) method.
Next we update the value of the selected variable to the new specified value and if it is valid (>= 0) then we highlight that particular object. For this we fetch the first material of the object, where we also assume that the object has only one material and select it by index. Next we remove all existing attributes of the originalMaterial using the 'clear()' method and add all attributes of the selected object to it. Next we do the same for the material itself using the selectionMaterial. Which will cause the material to only contain the diffuse color like we set in the 'create()' method.
All the changes up until now should be really straight forward. The 'getObject(x,y)' method is where the actual magic happens. Let's have a look at it.
	public int getObject (int screenX, int screenY) {
		Ray ray = cam.getPickRay(screenX, screenY);
		...
	}
We start by getting the pick ray from the camera. So, what's a pick ray, you might ask. For every screen coordinate there are an infinite number of 3d coordinates. For example, if you have a camera with the coordinate (x=0,y=0,z=0) at the center of the screen looking towards -Z (which is very common), then an object at (x=0,y=0,z=-10) will be drawn at the same location as an object at (x=0,y=0,z=-20). Thus the screen coordinate at the center of the screen represents both the coordinates (0,0,-10) and (0,0,-20) and all coordinates in between, etc. You can think of this as a straight line through all possible 3d coordinates for the specified screen coordinate. This is called a pick ray and is represented by a starting point called the origin (the first visible point, which is located at the camera's near plane) and a direction vector pointing away from the camera. Mathematically this can be seen as: f(t) = origin + t * direction.
So basically we need to check which object intersects with the ray to find the object at the specified screen coordinate. However, it is possible (depending on e.g. the angle of the camera) that multiple objects intersect with the ray. In that case we’ll have to decide which object to choose. Since it is likely that an object closer to the camera is more visible than an object further away from the camera, we’ll use the distance of the object to the camera (the ray origin) to make this decision.
	public int getObject (int screenX, int screenY) {
		Ray ray = cam.getPickRay(screenX, screenY);

		int result = -1;
		float distance = -1;

		for (int i = 0; i < instances.size; ++i) {
			final GameObject instance = instances.get(i);

			instance.transform.getTranslation(position);
			position.add(instance.center);

			float dist2 = ray.origin.dst2(position);
			if (distance >= 0f && dist2 > distance)
				continue;

			if (Intersector.intersectRaySphere(ray, position, instance.radius, null)) {
				result = i;
				distance = dist2;
			}
		}

		return result;
	}
After getting the ray, we add two variables. One to store the current object closest to the camera and one to store the distance of that object to the camera. We set those variables to -1 to indicate that there currently is no closest object. Next we iterate over all objects and fetch the current instance. Then we fetch the location of the object and offset it so we have the center of the object, just like we do for frustum culling.
Next we calculate the squared distance between the (center of the) object and the origin of the ray (which is closest to the camera). Note that calculating the squared distance is slightly faster than the actual distance (because the calculation uses squared values, a^2 + b^2 = c^2), so where possible we try to use the squared distance. If this object is further away than the currently closest object, then there’s no need to proceed with the calculation and therefor we continue to the next object.
Next we need to check if the object intersects with the ray. Luckily libgdx contains a nice helper class for such calculations called ‘Intersector’. Just like we do for frustum culling, we check against the bounding sphere. Although this might cause more false-positives, it is quite fast and also works when the object and/or camera is rotated. Later we will take a quick look at more precise methods.
If the ray and the bounding sphere intersects, we have to update the ‘result’ and ‘distance’ variables accordingly. And finally we return the index of the intersecting object closest to the camera.
Let’s check out these changes and see if it works:
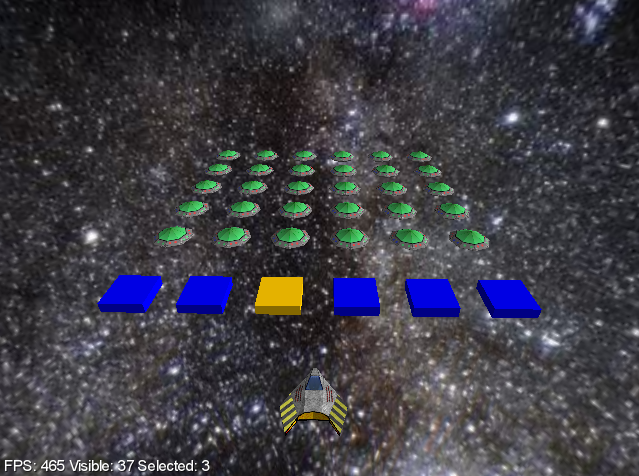
Well that seems to work quite well. If you try to select for example an invader further away, you might notice the inaccuracy of using the bounding sphere. But overall it does what we expected.
When an object is selected, we can use the ray to move the object. It is relatively easy to implement this. However, moving an object around in a 3d world using a 2d screen requires that you for example restrict the movement to a single plane. Since all our objects are located at the XZ plane (y=0), we’ll use that plane to implement moving the objects. For this, we only have to update the ‘touchDragged’ method:
    @Override
    public boolean touchDragged(int screenX, int screenY, int pointer) {
    	if (selecting < 0)
    		return false;
    	if (selected == selecting) {
    		Ray ray = cam.getPickRay(screenX, screenY);
    		final float distance = -ray.origin.y / ray.direction.y;
    		position.set(ray.direction).scl(distance).add(ray.origin);
    		instances.get(selected).transform.setTranslation(position);
    	}
    	return true;
    }
Just like before, if we aren’t selecting an object we return false and if we are selecting an object we return true. But now, if we are selecting an object and it is the same object as previously selected we’ll move it around. That is: the user have to tap to select and can then move the object.
To actually move it around, we first get the ray from the camera. Next we calculate the distance from the origin of the ray to the location on the XZ plane (where y=0). Remember:
f(t) = origin + t * direction, for the y-component this is:y = origin.y + t * direction.y, or since we wanty=0, it is:0 = origin.y + t * direction.y. Substractt * direction.yfrom both sides and we get:-t * direction.y = origin.y. Negate the equation and we get:t * direction.y = -origin.y. We want the value oftso let’s divide bydirection.y:t = -origin.y / direction.y.
Now we know the distance, we can get the location on the ray using direction * distance + origin and set the translation of the selected object accordingly. Let’s run it and see how it works:
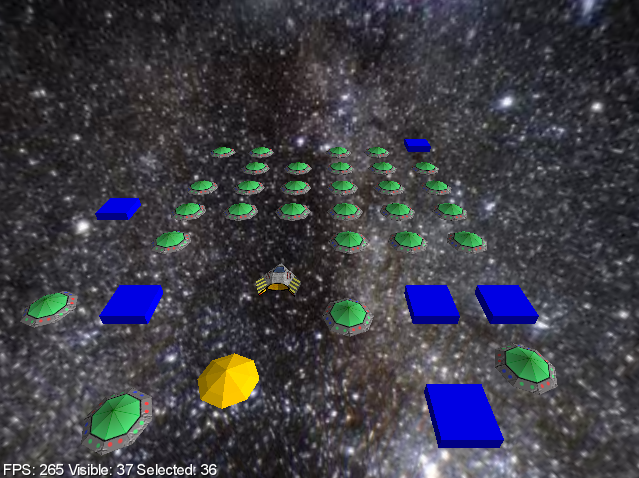
We are now able to interact with 3d objects. Of course you don’t have to restrict to ZX (y=0) plane, you can use any plane you want. It is basically a matter of math to use the ray to interact with 3d object.
This brings us back to the accuracy of the getObject(x, y) method, which seems to be quite inaccurate for the distant invaders. We can also solve this using some math. The inaccuracy is caused by an object closer to the camera of which it’s bounding sphere intersects with the pick ray, while it’s actual visual shape doesn’t. Of course we could solve this by using a more accurate shape (and we might look into that in a future tutorial), but in our case that would be an overkill. Instead of using the distance to the camera, we can use the distance of the center of the object to the ray to decide whether or not should be chosen.
For that we need to find the point on the ray closest to the center of the object. This can be done using something called vector projection. I will not go into details about the math behind it (although I would suggest to read into it if you want to use it). However, the calculation is so close to the implementation of ‘Intersector.insersectRaySphere(…)’, that we might as well do the complete calculation our self and avoid duplicate calculations. So here’s the new getObject(x, y) method:
	public int getObject (int screenX, int screenY) {
		Ray ray = cam.getPickRay(screenX, screenY);

		int result = -1;
		float distance = -1;

		for (int i = 0; i < instances.size; ++i) {
			final GameObject instance = instances.get(i);

			instance.transform.getTranslation(position);
			position.add(instance.center);

			final float len = ray.direction.dot(position.x-ray.origin.x, position.y-ray.origin.y, position.z-ray.origin.z);
			if (len < 0f)
				continue;

			float dist2 = position.dst2(ray.origin.x+ray.direction.x*len, ray.origin.y+ray.direction.y*len, ray.origin.z+ray.direction.z*len);
			if (distance >= 0f && dist2 > distance)
				continue;

			if (dist2 <= instance.radius * instance.radius) {
				result = i;
				distance = dist2;
			}
		}
		return result;
	}
Here we basically project the center of the object onto ray, which gives the (distance to the) point on the ray closest to the object. Then we check the squared distance between that point and the center of the object and use that to decide whether or not to select the object. I won’t go into the details about the math (there are plenty of sites describing vector projection). If you run this, you’ll notice it is much more accurate then the previous method of selecting objects.
In the next tutorial we will look at a method to achieve better accuracy using collision shapes.
This webpage is open source and can be found at: https://github.com/xoppa/xoppa.github.io.
The accompanying sources can be found at: https://github.com/xoppa/blog.
Let me know what you think about this post in the comments below. If you need help then please use the forum instead. If you found an issue with this post then please report an issue or send a pull request.