
In the first part of this tutorial we’ve seen the overall structure of the Model class of the LibGDX 3D API. In this second part we will look at the rendering pipeline, starting from loading the model, all the way up to actually rendering the model. We will not go in depth on each specific part of the rendering pipeline. We’ll just look at the very basics, which I think you should know when working with the 3D api.
The full source, assets and a runnable tests of this tutorial can be found on this github repository.
Since we are looking at the actual rendering in this part. It is important to understand what we are actually rendering. We have seen that in the previous part of this tutorial. A Model is made up of nodes, which them selves are made up of node-parts. A NodePart is the smallest part of Model that contains all information about how it should be rendered. It contains a MeshPart, which describes what (the shape) should be rendered and it contains a Material which describes how it should be rendered. Make sure to keep that in mind while reading through this part of the tutorial.
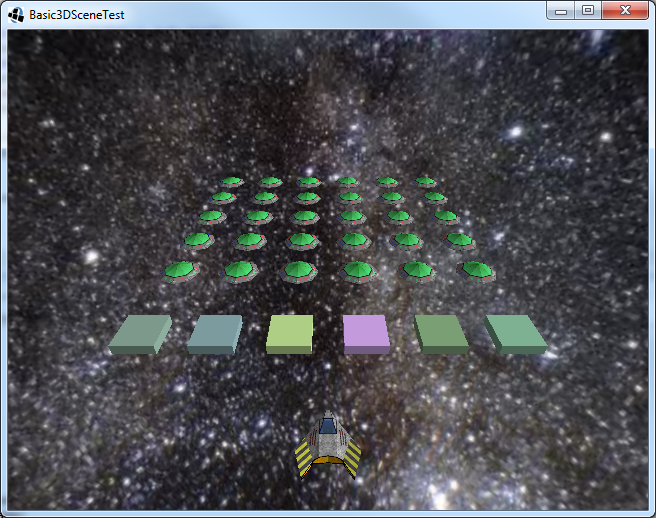
We start where we left of in the Loading a scene with libGDX tutorial. We will break down the code to get a glimpse behind the scenes. Therefor you might want to make a backup or a copy to work on. For reference here is the code:
public class BehindTheScenesTest implements ApplicationListener {
	public PerspectiveCamera cam;
	public CameraInputController camController;
	public ModelBatch modelBatch;
	public AssetManager assets;
	public Array<ModelInstance> instances = new Array<ModelInstance>();
	public Environment environment;
	public boolean loading;

	public Array<ModelInstance> blocks = new Array<ModelInstance>();
	public Array<ModelInstance> invaders = new Array<ModelInstance>();
	public ModelInstance ship;
	public ModelInstance space;

	@Override
	public void create () {
		modelBatch = new ModelBatch();
		environment = new Environment();
		environment.set(new ColorAttribute(ColorAttribute.AmbientLight, 0.4f, 0.4f, 0.4f, 1f));
		environment.add(new DirectionalLight().set(0.8f, 0.8f, 0.8f, -1f, -0.8f, -0.2f));

		cam = new PerspectiveCamera(67, Gdx.graphics.getWidth(), Gdx.graphics.getHeight());
		cam.position.set(0f, 7f, 10f);
		cam.lookAt(0,0,0);
		cam.near = 1f;
		cam.far = 300f;
		cam.update();

		camController = new CameraInputController(cam);
		Gdx.input.setInputProcessor(camController);

		assets = new AssetManager();
		assets.load("data/invaderscene.g3db", Model.class);
		loading = true;
	}

	private void doneLoading() {
		Model model = assets.get("data/invaderscene.g3db", Model.class);
		for (int i = 0; i < model.nodes.size; i++) {
			String id = model.nodes.get(i).id;
			ModelInstance instance = new ModelInstance(model, id);
			Node node = instance.getNode(id);

			instance.transform.set(node.globalTransform);
			node.translation.set(0,0,0);
			node.scale.set(1,1,1);
			node.rotation.idt();
			instance.calculateTransforms();

			if (id.equals("space")) {
				space = instance;
				continue;
			}

			instances.add(instance);

			if (id.equals("ship"))
				ship = instance;
			else if (id.startsWith("block"))
				blocks.add(instance);
			else if (id.startsWith("invader"))
				invaders.add(instance);
		}

		loading = false;
	}

	@Override
	public void render () {
		if (loading && assets.update())
			doneLoading();
		camController.update();

		Gdx.gl.glViewport(0, 0, Gdx.graphics.getWidth(), Gdx.graphics.getHeight());
		Gdx.gl.glClear(GL10.GL_COLOR_BUFFER_BIT | GL10.GL_DEPTH_BUFFER_BIT);

		modelBatch.begin(cam);
		modelBatch.render(instances, environment);
		if (space != null)
			modelBatch.render(space);
		modelBatch.end();
	}

	@Override
	public void dispose () {
		modelBatch.dispose();
		instances.clear();
		assets.dispose();
	}

	@Override public void resume () {}
	@Override public void resize (int width, int height) {}
	@Override public void pause () {}
	@Override public void dispose () {}
}
View full source code on github
Here we use AssetManager to load the Model which is in most scenario’s the best choice. But sometimes you might want to have more control over the loading process. Therefor we remove AssetManager for this tutorial:
public class BehindTheScenesTest implements ApplicationListener {
	public PerspectiveCamera cam;
	public CameraInputController camController;
	public ModelBatch modelBatch;
	public Model model;
	public Array<ModelInstance> instances = new Array<ModelInstance>();
	public Environment environment;
	...

	@Override
	public void create () {
		...
		Gdx.input.setInputProcessor(camController);

		ModelLoader modelLoader = new G3dModelLoader(new JsonReader());
		ModelData modelData = modelLoader.loadModelData(Gdx.files.internal("data/invaderscene.g3dj"));
		model = new Model(modelData, new TextureProvider.FileTextureProvider());
		doneLoading();
	}

	private void doneLoading() {
		for (int i = 0; i < model.nodes.size; i++) {
			...
		}
	}

	@Override
	public void render () {
		camController.update();
		...
	}

	@Override
	public void dispose () {
		modelBatch.dispose();
		instances.clear();
		model.dispose();
	}
	...
}
View full source code on github
Here we removed AssetManager and instead manually load the model, therefor we call the doneLoading() method right after the model is loaded. We also load the invaderscene.g3dj file we created in the previous part instead of the invaderscene.g3db file. So make sure to copy that file to the data folder within the assets folder of your project. Now look at the actual loading part:
ModelLoader modelLoader = new G3dModelLoader(new JsonReader());
ModelData modelData = modelLoader.loadModelData(Gdx.files.internal("data/invaderscene.g3dj"));
model = new Model(modelData, new TextureProvider.FileTextureProvider());
We create a ModelLoader, which we have seen earlier in Loading models using libGDX. But instead of the ObjLoader we used earlier we now create a G3dModelLoader. We construct it with a JsonReader as argument, because the file format of the invaderscene.g3dj is json. For a g3db file you can use UBJsonReader.
Next we load the ModelData. The ModelData class contains the raw model data. It’s basically an one on one representation of the file format we’ve seen in the previous part. It doesn’t contain any resources. It simply contains an array of floats and shorts instead of a Mesh and for textures it simply contains the filename instead of the actual textures. So at this stage you can do with the data whatever you like, without even having to think about the Model class or any resources.
Finally on the last line of the create() method we construct the Model using the ModelData we just loaded. We also add a TextureProvider as argument, which will load the textures as internal files. You can implement the TextureProvider interface if you would like more control over loading the textures. If you use AssetManager to load the Model, then AssetManager is also used to load the textures. Now the Model and it’s resources like the meshes and textures are loaded, the Model is also responsible for disposing them.
Now let’s play with materials:
	private void doneLoading() {
		Material blockMaterial = model.getNode("block1").parts.get(0).material;
		ColorAttribute colorAttribute = (ColorAttribute)blockMaterial.get(ColorAttribute.Diffuse);
		colorAttribute.color.set(Color.YELLOW);
		for (int i = 0; i < model.nodes.size; i++) {
		...
		}
	}
View full source code on github
On the first line we fetch the block1 node of the model, which we know is in there, fetch its first node-part and get its material. We’ve seen in the previous part that this is a reference to the “block_default1” material, which is shared amongst all block nodes. So changing it, will change the material of all blocks. On the second line we fetch the Diffuse ColorAttribute of the material, which we also know is in there. And finally we set the color of the attribute to yellow.

However that requires a lot of knowledge about the actual model, let’s take another approach:
	private void doneLoading() {
		Material blockMaterial = model.getMaterial("block_default1");
		blockMaterial.set(ColorAttribute.createDiffuse(Color.YELLOW));
		for (int i = 0; i < model.nodes.size; i++) {
		...
		}
	}
View full source code on github
Same result, but instead we now access the material directly by it’s ID. And we don’t fetch the current diffuse color, we just set it. So if the material doesn’t have a diffuse color it is added, otherwise it is overwritten.
Changing the material within a Model will affect all ModelInstances that are created after that. You can also change the material per instance:
	private void doneLoading() {
		for (int i = 0; i < model.nodes.size; i++) {
			...
		}
		for (ModelInstance block : blocks) {
			float r = 0.5f + 0.5f * (float)Math.random();
			float g = 0.5f + 0.5f * (float)Math.random();
			float b = 0.5f + 0.5f * (float)Math.random();
			block.materials.get(0).set(ColorAttribute.createDiffuse(r, g, b, 1));
		}
	}
View full source code on github
Instead of getting the material through the node or by it’s ID (which is also possible) we now simply get the first material, because the ModelInstance only has one material attached to it.
Previously we have seen the structure of the Model class by inspecting the G3DJ file. Now take a look at the ModelInstance class.
public class ModelInstance implements RenderableProvider {
	public final Array<Material> materials = new Array<Material>();
	public final Array<Node> nodes = new Array<Node>();
	public final Array<Animation> animations = new Array<Animation>();
	public final Model model;
	public Matrix4 transform;
	public Object userData;
	...
}
Just like Model it contains a materials, nodes and animations array. These are copied from the model when constructing the ModelInstance, allowing you to alter them without affecting other ModelInstances of the same Model. When you specify a node ID when creating the ModelInstance, only the materials and animations are copied that affect that node. Therefor, like we did with the block ModelInstance, we know that the first material will always affect the specified block node.
Note that unlike the Model class, the ModelInstance doesn’t have a Mesh and MeshPart array. These are not copied, but instead referenced through the Node (NodePart). So meshes are still shared amongst multiple model instances. This is also true for any textures the materials might contain.
The model field in the ModelInstance class is a reference to the Model it is created from. The transform field represents the position, rotation and scale of this particular ModelInstance. We’ve seen that before in the loading a scene tutorial. Note that this field is not final, meaning you can set it another Matrix4 reference if needed. Finally the userData field is a user definable value you can set to whatever you might need. For example, you can use this value to supply extra instructions to your shader (more on that soon).
Notice that ModelInstance implements the RenderableProvider interface. When we call modelBatch.render(instance, lights);, the ModelBatch actually expects a RenderableProvider instead of a ModelInstance. A class that implements a RenderableProvider supplies one or more Renderable objects to the ModelBatch. Take a look at the Renderable class:
public class Renderable {
	/** the model transform **/
	public final Matrix4 worldTransform = new Matrix4();
	/** The MeshPart that contains the shape to render **/
	public MeshPart meshPart;
	/** the material to be applied to the mesh **/
	public Material material;
	/** the bones transformations used for skinning, or null if not applicable */
	public Matrix4 bones[];
	/** the Environment to be used to render this Renderable, may be null **/
	public Environment environment;
	/** the Shader to be used to render this Renderable, may be null **/
	public Shader shader;
	/** user definable value. */
	public Object userData;
}
Like we’ve seen before, the NodePart is the smallest part of a model that describes how it should be rendered. It contains a MeshPart and a Material. A Renderable also contains these values (flattened out) along with the provided transform, lights, shader and userData. So when you call ModelBatch.render(ModelInstance), all node parts within the ModelInstance are converted into Renderable instances and fed into the ModelBatch. Let’s do that manually:
public class BehindTheScenesTest implements ApplicationListener {
	public PerspectiveCamera cam;
	public CameraInputController camController;
	public ModelBatch modelBatch;
	public Model model;
	public Environment environment;
	public Renderable renderable;

	@Override
	public void create () {
		...
		cam.position.set(2f, 2f, 2f);
		...
		model = new Model(modelData, new TextureProvider.FileTextureProvider());

		NodePart blockPart = model.getNode("ship").parts.get(0);

		renderable = new Renderable();
		renderable.meshPart.set(blockPart.meshPart);
		renderable.material = blockPart.material;
		renderable.environment = environment;
		renderable.worldTransform.idt();
	}

	@Override
	public void render () {
		camController.update();

		Gdx.gl.glViewport(0, 0, Gdx.graphics.getWidth(), Gdx.graphics.getHeight());
		Gdx.gl.glClear(GL10.GL_COLOR_BUFFER_BIT | GL10.GL_DEPTH_BUFFER_BIT);

		modelBatch.begin(cam);
		modelBatch.render(renderable);
		modelBatch.end();
	}

	@Override
	public void dispose () {
		modelBatch.dispose();
		model.dispose();
	}
	...
}
View full source code on github
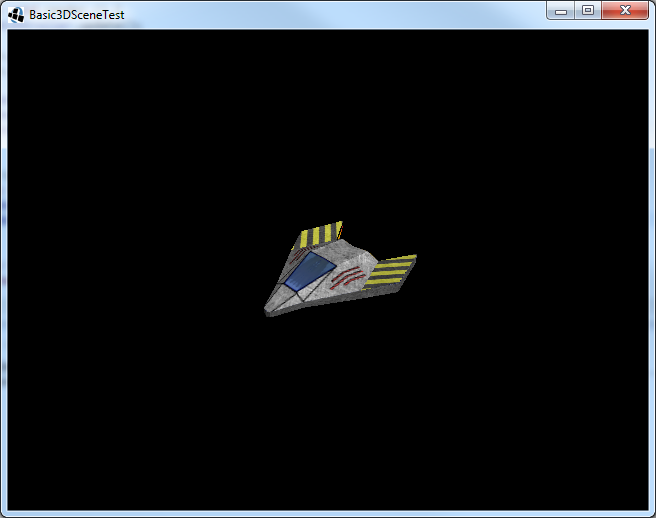
Here we load the invaderscene.g3dj just like before, but now we fetch the first NodePart of the ship Node. From that NodePart we create a Renderable, setting each value to the corresponding value of the NodePart. We also set the lights of the Renderable and make sure the worldTransform is set to identity meaning at position (0,0,0), not rotated and not scaled. We removed the ModelInstances, instead in the render method we now only provide the renderable to the ModelBatch. I’ve also set the camera a bit closer to the origin to get a better view.
A ModelInstance is responsable for providing the renderables and ModelBatch is responsable for rendering those Renderable instances. But ModelBatch doesn’t actually render them. Instead it sorts them so they are rendered in the most optimal order and then passes them to the renderable’s shader. Note that if no shader is provided (or the provided shader is not suitable), the ModelBatch will create a Shader for us. It does that by asking a ShaderProvider for the required shader. We will not look further into that for now, but note that you can provide your own ShaderProvider when constructing the ModelBatch.
So a Shader is responsible for rendering a Renderable. It does whatever it needs to do to render the provided Renderable. Unlike the name might suggest it can be an OpenGL ES 1.x shader. For OpenGL ES 2.0 it will encapsulate a ShaderProgram and set uniforms and attributes according to the specified Renderable.
public class BehindTheScenesTest implements ApplicationListener {
	public PerspectiveCamera cam;
	public CameraInputController camController;
	public Shader shader;
	public RenderContext renderContext;
	public Model model;
	public Environment environment;
	public Renderable renderable;

	@Override
	public void create () {
		environment = new Environment();
		...
		model = new Model(modelData, new TextureProvider.FileTextureProvider());

		NodePart blockPart = model.getNode("ship").parts.get(0);

		renderable = new Renderable();
		renderable.meshPart.set(blockPart.meshPart);
		renderable.material = blockPart.material;
		renderable.environment = environment;
		renderable.worldTransform.idt();

		renderContext = new RenderContext(new DefaultTextureBinder(DefaultTextureBinder.WEIGHTED, 1));
		shader = new DefaultShader(renderable);
		shader.init();
	}

	@Override
	public void render () {
		camController.update();

		Gdx.gl.glViewport(0, 0, Gdx.graphics.getWidth(), Gdx.graphics.getHeight());
		Gdx.gl.glClear(GL10.GL_COLOR_BUFFER_BIT | GL10.GL_DEPTH_BUFFER_BIT);

		renderContext.begin();
		shader.begin(cam, renderContext);
		shader.render(renderable);
		shader.end();
		renderContext.end();
	}

	@Override
	public void dispose () {
		shader.dispose();
		model.dispose();
	}
	...
}
View full source code on github
Here we removed the ModelBatch and added a RenderContext and Shader. A RenderContext keeps tracks of the OpenGL state to eliminate state switching between shader switches. For example, if a Texture is already bound, it doesn’t need to be bound again. We construct the RenderContext with the DefaultTextureBinder which keeps track of which texture is bound to which texture unit and tries to eliminate texture binds by reusing texture units. Next we construct the shader as DefaultShader with the renderable as argument. Note that DefaultShader is an OpenGL ES 2.0 shader, so you must enable GLES20 for this to work.
In the render method we call renderContex.begin() to make sure the context is in the initial state. Next we call shader.begin to instruct the shader to do whatever it needs to do to start rendering. This will set any global uniforms like the projection matrix etc. Then we render the renderable using the shader. And finally we call shader.end and renderContext.end to cleanup things.
To summarize:
- ModelInstance contains a copy of the nodes and materials of a Model. But it only references the resources of the Model like the meshes and textures. A ModelInstance creates Renderable instances for each NodePart it contains.
- Renderable is the smallest renderable part, which is passed through the rendering pipeline.
- ModelBatch gathers a Shader for each Renderable and sorts the renderables to make sure they are rendered in an optimal order.
- Shader is responsible for actual rendering a Renderable. Most commonly an application uses multiple shaders, where each shader is dedicated to a single ShaderProgram (GLSL program). RenderContext is used to keep track of the OpenGL context, like which texture is currently bound.
This webpage is open source and can be found at: https://github.com/xoppa/xoppa.github.io.
The accompanying sources can be found at: https://github.com/xoppa/blog.
Let me know what you think about this post in the comments below. If you need help then please use the forum instead. If you found an issue with this post then please report an issue or send a pull request.